>>Downloads:<<
*brushes:*
Splats & Strokes Photoshop by
kabukitkatze in deviantart
I always use this kind of text effect when making headers
for my blog, now I'm gonna teach you how to do it :3
First thing need to do is open Adobe Photoshop >w<
...then do the following steps:
>>Go to File>New...fill in the height, width, etc...then click OK
(Make sure you make the background contents
transparent & its color mode in RGB Color [as always >:3])
(1.) Select your type tool...
(2.) Change your font, font style & font size...
(3.) Start typing xD
(4.) Right click on your text's layer
(5.) Click Create Work Path
(6.) Create a new layer
(7.) Delete your text's layer
(8.) The text's work path still stays, right click on the pen tool icon
then click Add Anchor Point Tool
(9.) Right click on your work path, then click Make Selection,
(10.) This window will appear, Feather Radius: 0 pixels,
Anti-aliased checked..
(11.) The work path will turn into broken lines, that means it's selected
(12.) Select the Paint Bucket Tool, Choose a color from your swatches, etc.
(13.) Fill in the selected area
(14.) Choose a another color from your swatches
(15.) Grab your brush tool, you can either change your brush or not.
(16.) Start designing your text, to whatever you like..
But I design mine using Paint Splatter Brushes
You can download the Paint Splatter Brush Set
from the given download link at the
"download" section at the top most part of this
post.
(17.) Keep on designing it until you feel comfortable about
what it looks. Grab your "Selection Tool"> Right click on your selected
area> Click Deselect
(18.) Right click on your text's layer (layer 1)> Click Blending Options
(20.) (I skipped number 19. lol..) This window will appear,
Click on the word "Stroke", not the box beside it. Adjust its size if you want &
change its color...Position: Outside, Blend Mode: Normal,
Opacity: 100% (as always) & fill type: color> then click OK
(21.)Right click on your text's layer (layer 1)> click "Duplicate Layer"
>Click OK
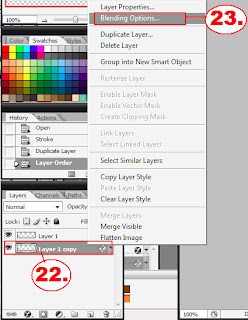
(22.) Your text's layer (layer 1) will now have a copy,
"layer 1 copy", place it below layer 1. Right Click on your text layer's copy
(Layer 1 copy)
(23.) Click Blending Options
(24.) Now this window will appear, this time Double
its size, example, your original text's layer's (which is layer 1)
stroke size is 3 px, then in your text's layer's copy,
its stroke size must be 6px. Choose a different color while
the Position, Blend Mode, Opacity & Fill Mode stays the same.
(25.) This will become the result.........In the next tutorial,
I'll show you how to add more effect on your text :3..
Tutorial 2: *COMING SOON*
>>Hope I helped >w<<<
or
"Click Home"
|
|
V


No comments:
Post a Comment