


 How I make my own cursors :3
~*<3Tutorial/s:<3*~
If you don't know much about
Paint Program or if you're just a beginner
here's a tutorial about Paint Program
Paint Program Tutorial
-------------------------
I love making my own cursors >w<!
If you don't know much about
Paint Program or if you're just a beginner
here's a tutorial about Paint Program
Paint Program Tutorial
-------------------------
I love making my own cursors >w<!
I make my cursors in Iconart.
IconArt - a program to where you can
make cursors & icons. Icons represent
files & programs :).
>>download IconArt<<
-------------------------
You can make 2 kinds of cursors here,
the static cursors & animated cursors.
What you'll need:
[] Paint Program
[] IconArt
How to make a.....
>>Static cursor<<
1.) Open up Paint Program.
This is where you draw your cursor.
2.) Mostly, my cursors are exactly 32 x 32
in size or less. So, go to image> attributes.
Type in 32 for both width & height > ok.
3.) Select your magnifier tool, then click on
the "8x []" so that you may have a closer
look on your cursor.


5.) Start drawing the outline of your decor, maybe?
You may draw anything u want as long as it fits the
canvas.

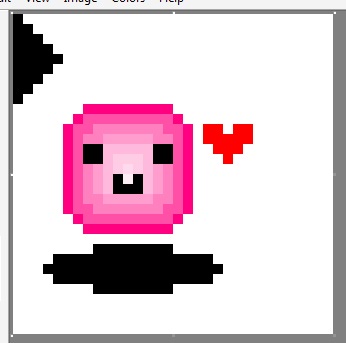
6.) Then start coloring your cursor, put in the shadows,
highlights, etc. I've also put a little heart beside it.

This is what my cursor looks like now

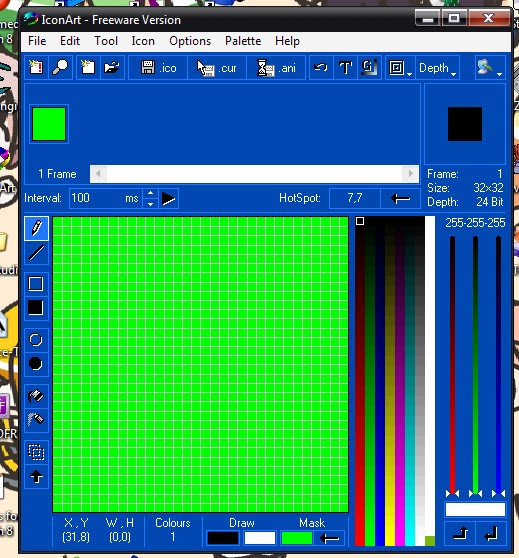
7.) Open up now your IconArt, don't exit
paint program yet.

This is what IconArt looks like, in case if you don't
know yet.

8.) Go back to your finished cursor. Click on
your Select Tool > right click> Select All
 Right Click again>Copy.

9.) Go back again to IconArt. Click File> Import
from Clipboard> then click on the
 or push "enter"

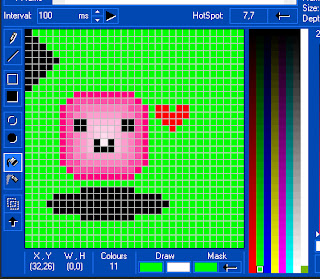
10.) Your cursor will now appear in IconArt.
It's background isn't transparent.
 Any color placed in the "mask" (the color green)
is the color used to make the background
transparent. When you fill it with the color in the "mask",
its background will now become transparent.
 So, to make it transparent, choose the lightest
 or choose any color then click the arrow below
the word "Mask".
11.) Select your paint bucket tool
 or click "7" on your keyboard,
then click on the background
to fill.
12.) Let's now save your cursor,
locate this part in IconArt.


 Make sure it's background is transparent,
to do so, click on the button boxed
in the image below.

2.) Go to Edit> Paste. Move your cursor's
copy beside it.

3.) To make it look like it's moving, i'll move the
cube a little upward & make the heart &
shadow smaller.

4.) Open up your IconArt, Go to File>New Project.
Go to the "Cursors" tab. You can add or either
subtract the number of frames you want.
The total number of my frames is 2.
Then click the Animated Cursor button.

5.) It will now have 2 frames. In each of the frames,
paste the original copy of your cursor &
its movements. Make the background
transparent, then if your done, change
the interval if you want, this tells how fast
your cursor moves> then click on the |>
Preview Animation button
 This window appears & shows how & what
your cursor will look like when it's finshed.

6.) Since it's a animated cursor,
I'll save it as ".ani". Click this
button so that you may save it as ".ani"


in size or less. So, go to image> attributes.
Type in 32 for both width & height > ok.
3.) Select your magnifier tool, then click on
the "8x []" so that you may have a closer
look on your cursor.
4.) You can start your cursor with a little arrow,
just like the one below, or other.

5.) Start drawing the outline of your decor, maybe?
You may draw anything u want as long as it fits the
canvas.
6.) Then start coloring your cursor, put in the shadows,
highlights, etc. I've also put a little heart beside it.
This is what my cursor looks like now

7.) Open up now your IconArt, don't exit
paint program yet.
This is what IconArt looks like, in case if you don't
know yet.
8.) Go back to your finished cursor. Click on
your Select Tool > right click> Select All
9.) Go back again to IconArt. Click File> Import
from Clipboard> then click on the
or push "enter"
10.) Your cursor will now appear in IconArt.
It's background isn't transparent.

is the color used to make the background
transparent. When you fill it with the color in the "mask",
its background will now become transparent.
green color  . From this part,
. From this part,the word "Mask".
11.) Select your paint bucket tool
then click on the background
to fill.

12.) Let's now save your cursor,
locate this part in IconArt.
Since it's a static cursor, we will save
it as ".cur". Click this button to save
your cursor as ".cur"
>>Animated Cursor<<
1.) When you're done drawing & coloring your
cursor, click the select tool> select your cursor
>right click on it> Copy.
to do so, click on the button boxed
in the image below.
2.) Go to Edit> Paste. Move your cursor's
copy beside it.

3.) To make it look like it's moving, i'll move the
cube a little upward & make the heart &
shadow smaller.

4.) Open up your IconArt, Go to File>New Project.
Go to the "Cursors" tab. You can add or either
subtract the number of frames you want.
The total number of my frames is 2.
Then click the Animated Cursor button.

5.) It will now have 2 frames. In each of the frames,
paste the original copy of your cursor &
its movements. Make the background
transparent, then if your done, change
the interval if you want, this tells how fast
your cursor moves> then click on the |>
Preview Animation button
your cursor will look like when it's finshed.
I'll save it as ".ani". Click this
button so that you may save it as ".ani"
**Setting the Hotspot**
Hotspot - This spot is very important when you drag
& drop & click items. Make sure you place the hotspot
onto the tip of the cursor because if you place it at the middle
or in other places, you'll be confused.
**Test your cursor out**

You may ask questions but I can't answer some of
them 'cuz I'm also a beginner in making cursors :3.


